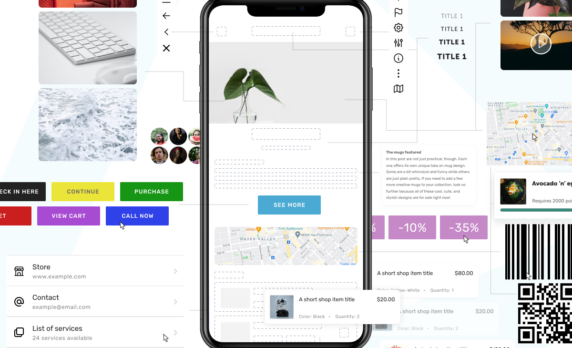
A mobile application can help you grow an existing business or launch a new one from the ground up. It is an excellent method to engage your online customers on their mobile devices, allowing you to increase your mobile traffic and encouraging active users to spend more time on your website. You must be wondering
Churches and businesses are different in many ways, but one thing they have in common is the need for clear goals. A marketing plan is an essential tool that helps you identify and reach those important milestones. People often assume that a marketing plan template is only useful for business marketing, but it’s equally valuable
Churches across the country are realizing that they need to embrace mobile communities to reach their members and communities. With the average screen time per person in the United States at seven hours daily, with slightly more than half of that time on mobile phones, a church app is a natural step in a congregation’s
When nearly every member of your church community carries a tiny computer in their pocket in the form of a smartphone, connecting members of your congregation on these devices only makes sense. Not only does creating a mobile app with a church app builder provide easy access to communicating between church staff and volunteers, but
If you work for a nonprofit or other organization that collects donations and engages in fundraising, then you need a fast, effortless system through which donors can contribute. A hassle-free, real-time donation solution will increase conversions and encourage long-term donors. Ideally, your donors will be able to give in a moment’s notice using a custom-built
Creating an app is exciting, but if you’ve never done it before, the cost breakdown of mobile app development can be confusing. The total price tag for app development ultimately depends on the type of app you have in mind and how you choose to bring it to life. Some sources estimate that having an
Mobile app development costs are anything but one-size-fits-all. From labor expenses to hosting and maintenance, the financial investment of hiring app developers in 2024 is as diverse and dynamic as apps themselves. But one thing is clear: the consumer demand for mobile apps has never been greater. In fact, it’s predicted that the total revenue
If you’re interested in mobile app development, then you need to make sure you understand how to build a cross-platform app for both Android and iOS. Without good attention to cross-platform functionality during mobile app development, you’re cutting your audience down substantially and therefore significantly reducing profits before you’ve even begun. For instance, while iPhone
The iPhone mobile app development market is stronger than ever — and it’s the perfect opportunity for YOU to bring in some revenue. Whether you’re considering building apps for others as a service, or building your own iPhone app for your business, it’ll only work in your benefit to learn how to create and publish
Business owners are continually looking for the “next big thing” — and while new products and innovative services are always in vogue, your next big thing may actually be more of a digital effort. We, all of us, are accustomed to handling just about everything from our iPhones and Android devices, and mobile apps are
Having a mobile app can create long-term revenue and customer engagement opportunities for your brand. But up until recently, the time and costs involved in building an app has made it difficult for most small- to medium-sized businesses to offer such a platform to their customers. These businesses, entrepreneurs, and startups had to partner with
When Apple started using the phrase, “There’s an app for that” in TV ads in 2009, it encapsulated the multitudinous level of apps for virtually all facets of life. Nearly 15 years later, this phrase remains increasingly relevant. Mobile apps continue to dominate the main stage for one main reason: they make life easier for
Looking back just a few years ago, developing and publishing a custom app was an expensive, time-consuming team effort, requiring user interface designers, workflow planners, and skilled programmers with expert-level experience in related programming languages like Java, Swift, Python, and HTML/CSS. Once a web app or mobile app was ready for publishing, you needed to
The way we work is changing rapidly, and with it, the tools we use to do our jobs. One of the most exciting developments in recent years is the rise of workforce apps – mobile applications designed specifically for the needs of the modern workforce. In this blog post, we will explore what workforce apps
We’ve all had that thought: I wish there were an app for that. And when it comes to education, there’s plenty of opportunity for app creation. Parents would love to track every step of their students’ journey, and communicate with other parents. Teachers need help managing their classrooms. Faculty and staff need to optimize school
A well know fact is that social media runs the world. It can break or make the brand. If you’re looking to build a startup in the world of overcrowding social media apps, it can feel almost impossible to make it. Still, there are new successful social media startups every day. You just have to
App development and app design are complicated processes. However, launching your app doesn’t mean you are finished with hard work. You can dream of it becoming big overnight because millions of users can download it from the app store. The reality is that the market is so competitive, that your app might be forgotten and
Creating a successful, functional, and the visually appealing app is a real challenge. No matter what type of app is in question, there is a high probability an app with similar functions is already available. How to make a standout app that will be user-friendly but also original? One of the key elements to achieve
We all feel a certain way about some brands and products. As the market became too saturated, the urge to classify and quantify those feelings emerged, as everybody wanted to excel in their respective business. It is hard to determine and measure customer loyalty, as everybody has different reasons and feelings behind being loyal to